How to Boil Eggs Perfectly: Soft, Medium, Hard & Easy Peeling
Boiling an egg might seem like the simplest culinary task, yet achieving that consistently perfect yolk – whether runny, jammy, or fully set – often feels like an elusive art. Many home cooks grapple with overcooked, rubbery whites, chalky yolks, or the eternal frustration of a stubborn shell that takes half the egg with it. But fear not! Mastering the art of boiling eggs, from a delicate soft boil to a firm hard boil, is entirely within your reach. It's a fundamental kitchen skill that’s both incredibly practical and delivers one of the most versatile, affordable, and nutritious foods. This comprehensive guide will equip you with the knowledge and precise timings needed to achieve perfection every single time, along with invaluable tips for stress-free peeling.
The Science Behind the Perfect Boil: Why Details Matter
The secret to perfectly boiled eggs lies not in magic, but in understanding a few fundamental principles. Dismissing these small details is one of the biggest mistakes people make when boiling eggs, leading to inconsistent results.
Egg Size and Weight: The Unsung Heroes of Timing
It’s tempting to assume all eggs cook uniformly, but their size and weight play a significant role. Simply put, smaller eggs heat through much faster than their larger counterparts. For instance, a small egg (around 45g) might be perfectly soft-boiled in 5 minutes, while a standard large egg (around 60g) could require 6 minutes or even longer. That seemingly minor difference in weight is enough to noticeably alter the texture of your yolk. Always consider the size of your eggs when setting your timer.
Bench vs. Fridge: The Temperature Tango
The starting temperature of your eggs is another critical factor. Eggs stored at room temperature (on the bench) will cook faster because they require less time to come up to the internal cooking temperature. Eggs straight from the fridge are significantly colder and will demand more time in the hot water to reach the desired doneness. As a general rule, for fridge-cold eggs, add an extra 30-60 seconds to the recommended cooking times. For the most consistent results, especially with soft or medium-boiled eggs, consider letting your eggs come to room temperature for 15-30 minutes before boiling if time allows. This small step can make your cooking times far more predictable. For an even deeper dive into these crucial factors, explore our article:
Master Egg Boiling: Why Size, Weight & Temperature Truly Matter.
Mastering the Art of Soft-Boiled Eggs (The Runny Yolk Dream)
A perfect soft-boiled egg boasts a delicate, just-set white and a gloriously golden, runny yolk – ideal for dipping toast soldiers.
Ingredients & Equipment
* Eggs (preferably room temperature for consistency)
* Water
* A pinch of salt (optional, some believe it helps prevent cracking)
* A medium saucepan
* A slotted spoon
* A reliable timer
Step-by-Step Method
1.
Boil the Water: Fill your saucepan with enough water to fully cover the eggs. Add a pinch of salt if desired. Bring the water to a rapid, rolling boil over high heat.
2.
Add the Eggs Gently: Using a slotted spoon, carefully lower your eggs one by one into the aggressively boiling water. This gentle approach helps prevent cracking from the sudden temperature change or impact.
3.
Start the Timer Immediately: This is crucial.
* For a
small egg (approx. 45g): Aim for
5 minutes.
* For a
standard large egg (approx. 60g): Aim for
6 minutes.
* If using
fridge-cold eggs, add an extra
30-60 seconds to these times.
4.
Remove and Serve: Once the timer goes off, carefully lift the eggs out of the water with your slotted spoon. Soft-boiled eggs are best enjoyed immediately and hot.
Serving Suggestions: The Classic Toast Soldiers
Place your soft-boiled egg into an egg cup or a small bowl. With a sharp knife, gently tap around the top third of the egg to crack the shell, then carefully lift the top off. Season lightly with a sprinkle of salt and freshly ground black pepper. Serve with hot buttered toast, cut into long, dippable strips – the quintessential "toast soldiers." This simple, comforting meal is a timeless classic that showcases the runny yolk beautifully.
Achieving the Perfect Medium-Boiled Egg (The Jammy Yolk Sweet Spot)
The medium-boiled egg offers the best of both worlds: fully set whites and a delightfully creamy, "jammy" yolk that is no longer runny but hasn't yet turned chalky. This texture is often preferred for salads, ramen, or just a standalone snack.
Timing is Key for Medium Eggs
To achieve that perfect jammy consistency, you'll simply extend the cooking time slightly beyond a soft boil. Use the same method as for soft-boiled eggs (adding eggs to boiling water):
* For a
standard large egg (approx. 60g): Aim for
7-8 minutes.
* Again, if starting with
fridge-cold eggs, add an extra
30-60 seconds to these times.
The Ice Bath Secret (Crucial for Medium & Hard)
Unlike soft-boiled eggs, which are best served hot, medium and hard-boiled eggs benefit immensely from an immediate ice bath. As soon as your timer dings, transfer the eggs from the hot water directly into a bowl of ice water. Let them cool for at least 5 minutes. This rapid cooling halts the cooking process, preventing overcooking and the dreaded green ring around the yolk. More importantly, it helps the egg contract away from the shell membrane, making peeling significantly easier.
Foolproof Hard-Boiled Eggs (Firm & Easy to Peel)
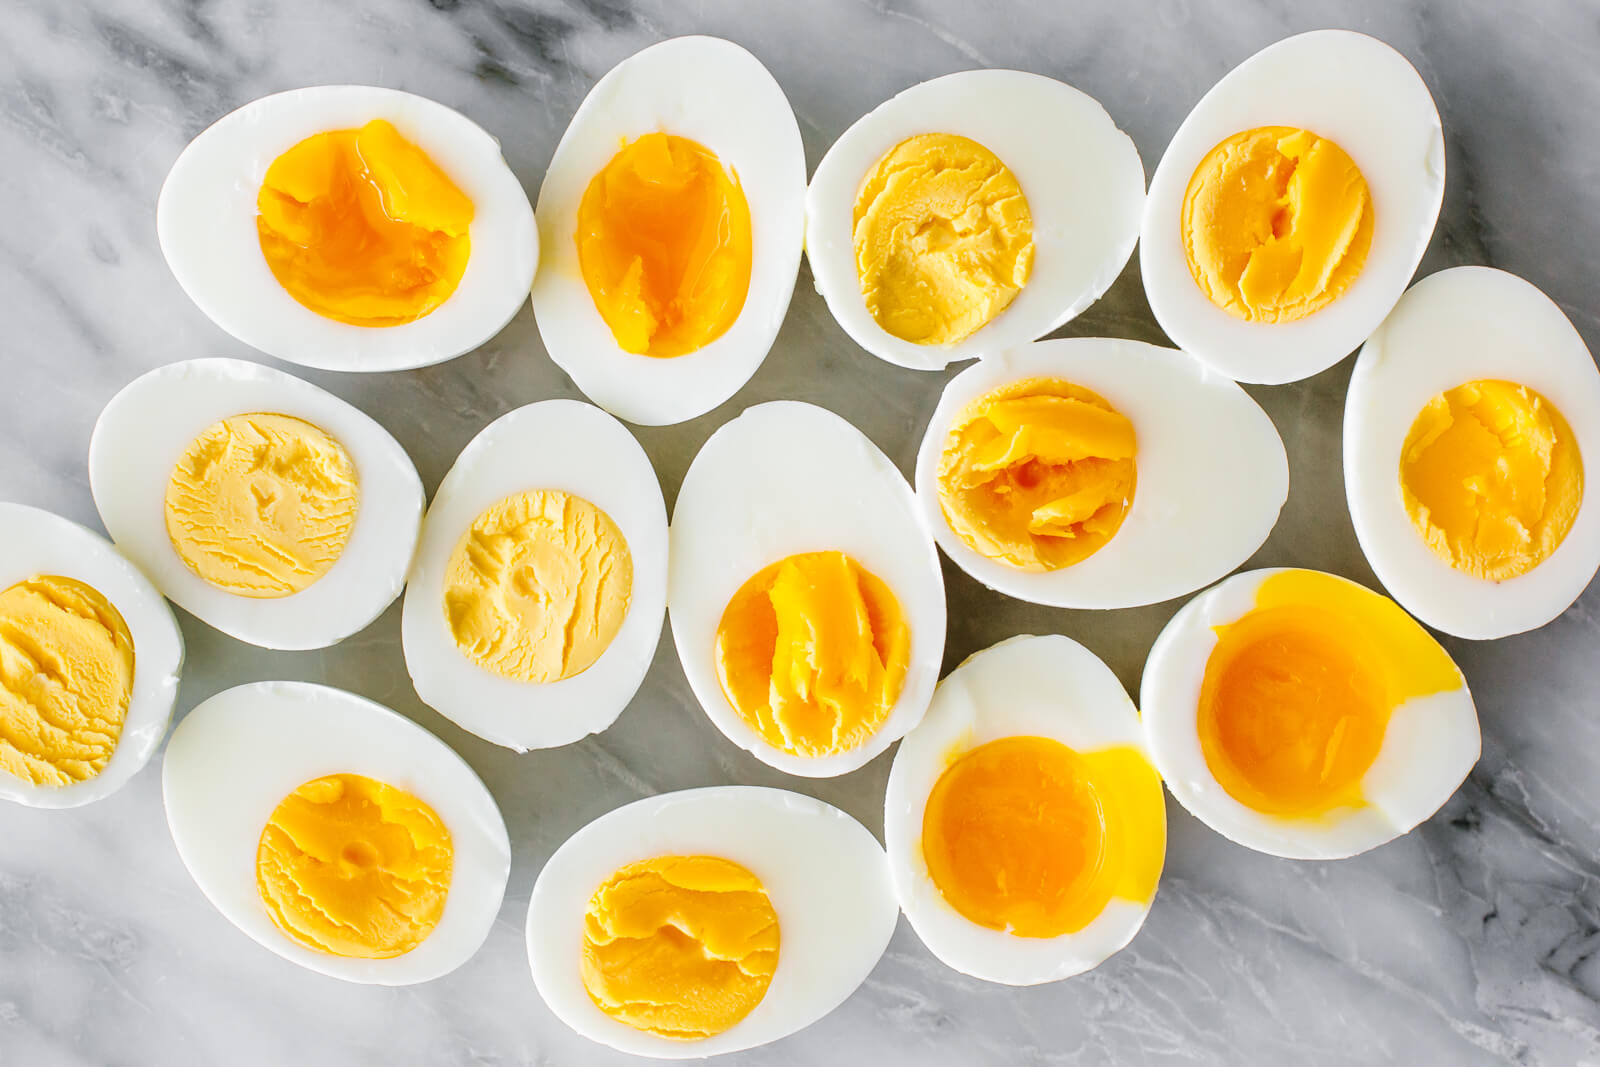
A perfectly hard-boiled egg has a firm, fully set white and a solid, vibrant yellow yolk, free from any greenish discoloration. The goal here is also effortless peeling. For hard-boiled eggs, we often recommend a slightly different, gentler cooking method that helps achieve both perfect texture and easy peeling.
The Gentle Start Method (and Timing)
1.
Arrange Eggs in Pot: Place your eggs in a single layer at the bottom of a saucepan.
2.
Cover with Cold Water: Pour cold water over the eggs until they are covered by about an inch.
3.
Bring to a Boil, Then Rest: Place the pot over high heat and bring the water to a rolling boil. As soon as the water reaches a full boil, immediately turn off the heat, cover the pot with a lid, and let the eggs sit in the hot water.
4.
Timing for Hard-Boiled:
* For a
standard large egg (approx. 60g): Let sit for
10-12 minutes.
* For
fridge-cold eggs or extra-large eggs: Let sit for
12-14 minutes.
This gentle method, where eggs slowly heat up with the water and then cook off-heat, is often credited with producing more tender whites and making the eggs easier to peel.
The Ice Bath: Non-Negotiable for Hard-Boiled
Immediately after the resting time, transfer the hard-boiled eggs to a bowl filled with ice water. Allow them to cool for at least 5-10 minutes. This abrupt temperature change is your best friend for easy peeling. It causes the egg proteins to shrink and pull away from the inner shell membrane, loosening their grip. For more insights on achieving flawlessly peeled eggs, consult our guide:
Your Guide to Perfect Soft-Boiled Eggs for Toast Soldiers & Hard.
Peeling Perfection: Tips & Tricks
*
Peel Under Water: Peel your eggs under cold running water or submerged in the ice bath. The water helps to get under the membrane and wash away small shell fragments.
*
Crack and Roll: Gently tap the wider end of the egg (where the air pocket is) on a hard surface to crack it, then gently roll the egg to create small cracks all over the shell.
*
Start at the Wider End: Begin peeling from the wider, air-pocket end. The membrane here is usually looser, allowing you to get under it more easily.
Properly stored in the refrigerator, hard-boiled eggs will last for up to 7 days, making them excellent for meal prep.
Troubleshooting Common Egg Boiling Mistakes
Even with the best instructions, issues can arise. Here’s how to tackle them:
*
Green Ring Around the Yolk: This is a clear sign of overcooking. The greenish-grey ring is ferrous sulfide, formed when sulfur in the egg white reacts with iron in the yolk under high heat for too long. Solution: Reduce cooking time and always use an ice bath immediately after cooking.
*
Cracked Eggs: Eggs cracking in the pot can be due to adding cold eggs directly into boiling water (thermal shock), dropping them too hard, or internal pressure. Solutions: Try bringing eggs to room temperature, add them very gently with a spoon, or use the cold-water start method for hard-boiled eggs. Adding a pinch of salt to the water can also help prevent leakage if a crack forms.
*
Difficult Peeling: This is often a frustration. Very fresh eggs (less than a week old) are notoriously harder to peel because their inner membrane clings tightly to the shell. Solution: Use eggs that are about a week old for hard and medium boiling. Always use an ice bath immediately after cooking – this is the single most effective trick for easy peeling.
Conclusion
Boiling eggs truly is a fundamental skill that, once mastered, opens up a world of culinary possibilities. By paying attention to egg size, starting temperature, precise timing, and the transformative power of an ice bath, you can consistently achieve eggs with perfect whites and yolks – whether you crave a runny soft-boiled delight, a creamy jammy medium-boiled treat, or a firm, easy-to-peel hard-boiled staple. Experiment with the timings, find your sweet spot, and enjoy the confidence that comes with perfecting this essential kitchen task. Your perfectly boiled eggs await!